In the last blog post, we covered why and how to create UI Messages. Now that we have a way to use TestStand to run a VI In the LabVIEW operator interface and even set a variable back in TestStand, we can start thinking about ways to use that technology to get our test data back from TestStand.
One way would be to allow one of the standard TestStand models to gather each step result into the ResultList array of Result containers. However, the Result container is largely step type dependent and you won’t know the full contents until runtime. This also sets you up so that every single step, action or test, gets an entry in the ResultList (though this can be managed by turning on the Result Recording: Disabled property in each step that you don’t want in the ResultList). You also, generally, would override the TestReport callback to parse the results in a custom manner directly within TestStand.
A simpler way, one which requires less (or at least different) custom TestStand knowledge, is to set up custom step types to report results directly back to your application and handle the reporting or recording there.
In this example, we are going to extend the Numeric Limit Test with a post-step substep. Substeps allow you to run specific code before and/or after normal step execution. We’re going to use this to transmit the result of our step back to LabVIEW via a custom UI Message. This could potentially be accomplished by adding additional action steps to the sequence but it is complicated to access the result of the previous step, it is prone to errors if the steps get reordered, and it clutters the sequence when tracing the flow.
The first step is to get a copy of the NI step type. In the TestStand Sequence Editor, hit Ctrl+T to get the types window to open, then click on NI_Types.ini in the view window, expand step types, highlight the NumericLimitTest entry, and hit Ctrl+C then Ctrl+V. This will give you NumericLimitTest_2. Highlight this entry, press F2, then rename it to something project specific like WTI_NumericLimitTest. Highlight the entry again, press Ctrl+X, click on MyTypes.ini (or your sequence file if you only want it attached to a specific sequence), then Ctrl+V. Now you have a cloned custom step already in your insertion palette.
 Expand your new step and right click in the empty area at the bottom to insert a new string field. Press F2 and rename this to keyname; we’ll use this in the example to delineate the source of the result.
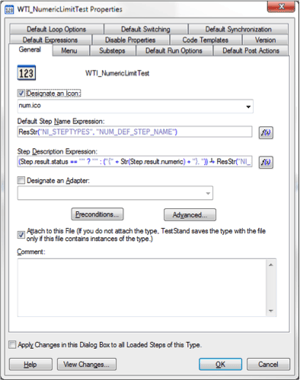
Now right click on the custom step type and click on properties. On the General tab you can rename the Default Step Name Expression to your own custom step name if you would like it to show up differently from the base step type. You can also change the name in the Step Description Expression (replace ResStr(…) with what you want displayed) and on the menu tab to change the displayed name in various locations.
Before we attach the post-step VI, let’s write it. We want the SequenceContext of the calling step, the keyname that marks the result, the status expression, and the datasource of the step in case it was modified by the person writing the test sequence. You can get the Sequence Context control under the TestStand submenu of the insertion palette on the LabVIEW front panel, the other controls will be strings. Let’s also include a LabVIEW standard error in and out.
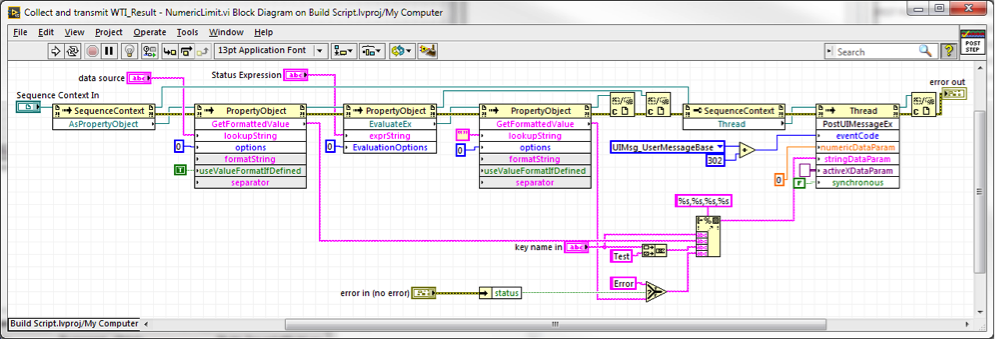
All of the nodes are standard method nodes except for the property node that outputs the Thread object. The data source input, by way of invoke node, produces GetFormattedValue, a formatted string for the numeric value under test (keeping in mind this is a custom Numeric Limits Test). The Status Expression input, by way of invoke nodes, produces GetFormattedValue, “Passed” or “Failed” depending on the result of the evaluation. Finally, we concatenate together a comma delimited list to pass back to the user interface through User Message 302. The package transmitted back is keyname, value, keynameTest, result.
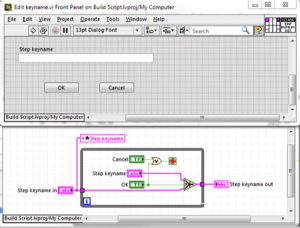 Let’s also build a simple keyname editor. This same basic template can be used to add editing capability to any number of custom properties on your custom step type (such as custom status messages or custom failure instructions). In this case we’ll just edit the keyname property. All we need is a keyname in to set the intial field value and a keyname out to write the field back in TestStand.
Now we just have to go back to the beginning and hook it all up. Back in the TestStand sequence editor, go to your custom type, and get to its properties page. Go to the substeps tab and click on Add » Edit. Highlight the new step, press F2, and rename it to Edit keyname.
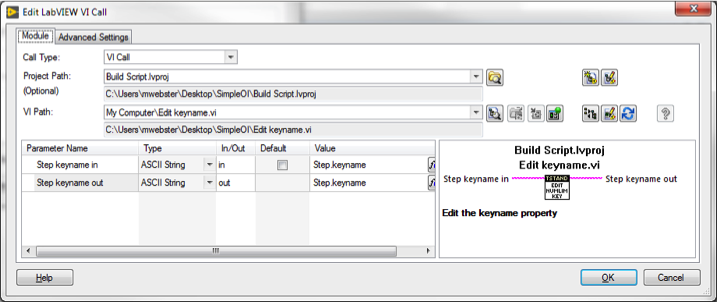
Click on Specify Module, then navigate to your project and VI for the keyname editor. Make sure to have Show Front Panel VI set to On (and do not set the VI itself to show its own front panel, TestStand takes care of this). Use Step.keyname for the input and the output of the VI.
Click OK, then Add again, then Post-Step. Click Specify Module and navigate to your project and VI for the post-step callback. Set the SequenceContext input to ThisContext, the key name in to Step.keyname, and the error in and out to Step.Result.Error.
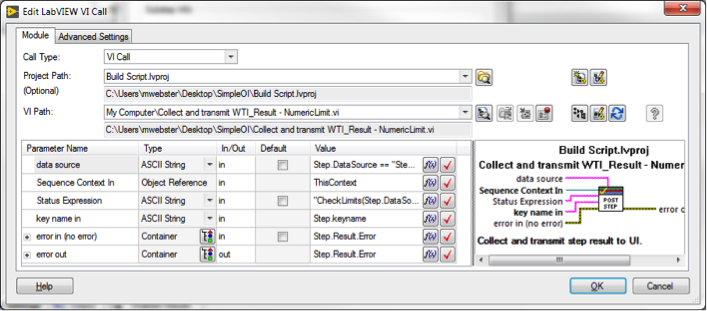
The data source is going to always be Step.Result.Numeric, but we may need to copy the result into that location if its sourced from an alternate location. The following expression does this:
Step.DataSource == "Step.Result.Numeric" ? Step.Result.Numeric : (Step.Result.Numeric = Evaluate(Step.DataSource)), "Step.Result.Numeric"
In TestStand, any number of expressions can be strung together by commas and the final expression is the value that is returned. In this case, if the Step.DataSource isn’t Step.Result.Numeric, then the datasource location is evaluated into Step.Result.Numeric.
The Status Expression is copied directly from the default status expression for this step (copy the relevant post-expression if implementing this on a different test type):
CheckLimits(Step.DataSource == "Step.Result.Numeric" ? Step.Result.Numeric : (Step.Result.Numeric = Evaluate(Step.DataSource)), Step.Limits.High, Step.Limits.Low, Step.Comp, True, Step.Limits.Nominal, Step.Limits.ThresholdType)
Click OK to exit and Ctrl+S to save. You will be prompted to increment the version number of the new type. Hit OK to accept the new version number.
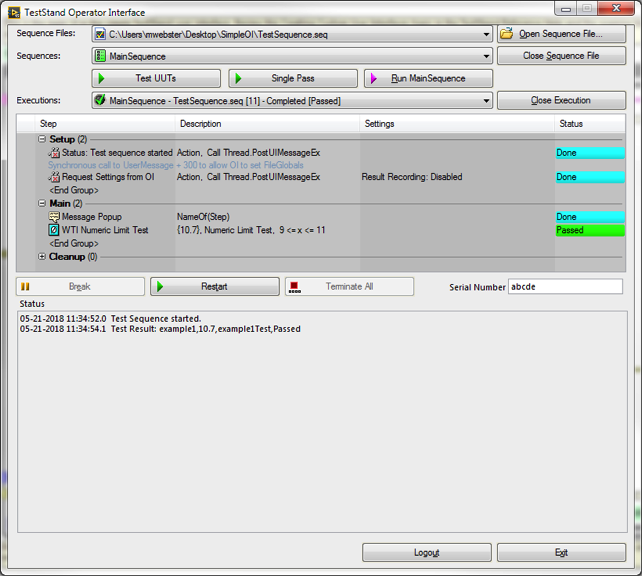
Now, when writing your sequence, you can use the new step type and the result of the test will automatically be transmitted back to your UserMessage event callback. A new case needs to be added there to handle message 10302 and then in your main code to do whatever you want with the resulting information. You’ll also note a new tab in your step settings along with a button called Edit Keyname. Clicking on this button will launch the VI we wrote before and allow an easy way to edit the custom property for the new step type. Alternately, you could go to Step.keyname directly in the variable editor, but it’s nice to be able to expose just the properties you generally want to edit while writing sequences.
I have the results of running a simple test sequence shown here where all I am doing with user messages, besides populating FileGlobals.SerialNumber, is to append the payloads to a status bar using a simple status bar library. In fact, all of the UI elements can be removed (or better yet, moved to one side and left in place for debug purposes) and replaced by direct TestStand API calls. When using this mode of testing, just use the Run MainSequence button, not the Test UUTs or Single Pass entry points. In fact, you can even set the sequence file to use no model at all and this method of running a test sequence will still work.