This is a multi-part blog post. In this post I will be talking about the basics of LabVIEW and Continuous Integration using Jenkins, with future posts discussing the use of virtual machines for dynamic build environments, expanding the LabVIEW Command Line Interface, builds triggered by source code control, automated unit testing, and more advanced topics.
There is a saying that floats around the software development space that goes something like this…
Build early, build often.
The earlier in your development lifecycle that you build your code, and the frequency at which you repeat this process, allows you to identify and fix potential issues quicker. This is good advice; however, it can be made much better by tweaking it like so...
Build early, build often, and build automatically.
Build automatically – that’s where Jenkins comes in. This is Jenkins.

Jenkins is a continuous integration service. To put this simply, it means that his job is to continually run tasks (most often to build code) on a schedule or according to certain triggers (such as a push to source control). Jenkins is a feature-rich service and can be expanded with a breadth of plugins to do all sorts of neat things, but for the purposes of this initial blog post I will just be talking about the basic steps needed to get automated builds running.
Install Jenkins Server
Jenkins is built on Java, and because of that you can run the server on just about anything you’d like. Windows, Linux, and Mac OSX are all supported environments. All the steps needed for installing Jenkins are listed here for each environment.
You’ll need to decide the best location to install Jenkins – whether that is on a local server or a spare PC you have floating around. The location on which you install the Jenkins server will be known as the “master” node. Jenkins can also distribute jobs to other nodes known as “slaves” (more on that in a future blog post).
It is recommended in the Jenkins community that you do not perform builds on the master node, and instead, delegate all builds to slave nodes. However, for getting something up and running and to run a few builds here and there the single node approach will work just fine.
Install the LabVIEW Command Line Interface (CLI)
The LabVIEW Command Line Interface allows you to automate basic tasks in LabVIEW through a command line interface. By default, it is installed with LabVIEW 2018; however, you can manually install it for LabVIEW 2014 through LabVIEW 2017 here.
If you are trying to automate builds with an older version of LabVIEW, then you’re not completely out of luck. In a future blog post I will discuss the WTI Builder Framework which was created before the LabVIEW Command Line Interface existed and is what we currently use to automate our builds (and is compatible with all versions of LabVIEW that support being called from command line).
When you go to create your LabVIEW job you will need to know the location of the LabVIEW Command Line Interface as you will be calling into it to carry out your build steps.
The LabVIEW Command Line Interface allows you to mass compile, execute a build specification, run a VI, and some other commands; you can find a full list of the commands available here.
Create and build your first Jenkins project with LabVIEW
Now that you have Jenkins installed with the prerequisite plugins, as well as the LabVIEW Command Line Interface, you are ready to create a job to build your LabVIEW application.
From the Jenkins homepage click “New item” and at the next page select “Freestyle project” and give your project a name, then hit OK at the bottom.
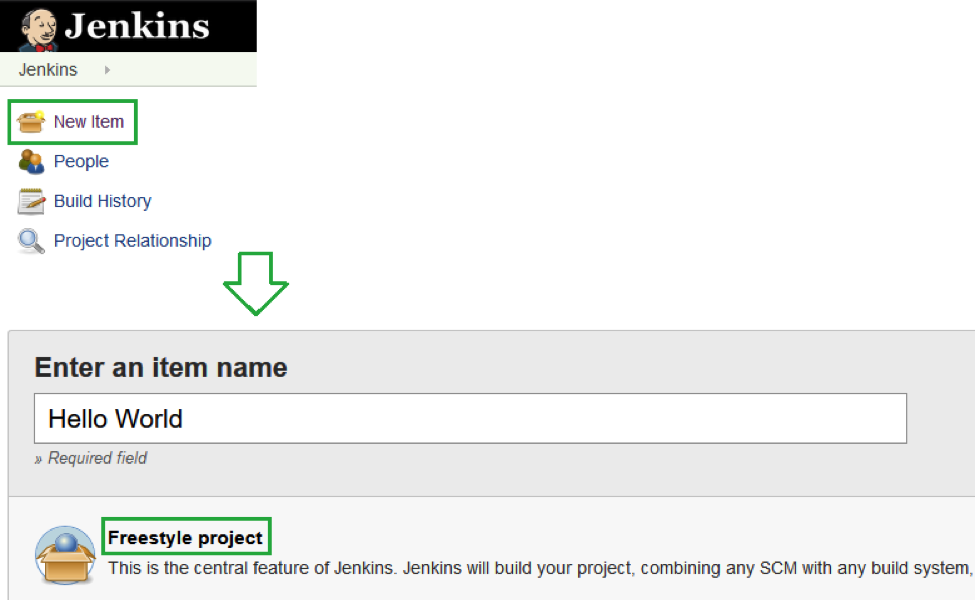
Now you will be presented with a page listing out all the configuration for the project you just created. For this example project we are only concerned with the “Build” section of the configuration page. Eventually your jobs will need to be linked to a source code control repository which can be configured through the Source Code Management section (more on that in a future blog post).
Under the build section you are going to add a built step of type “Execute Windows batch command”. In this step you will list out the individual LabVIEWCLI.exe command calls that you want to execute to build your project – below is an example of a project that will build a single build specification:
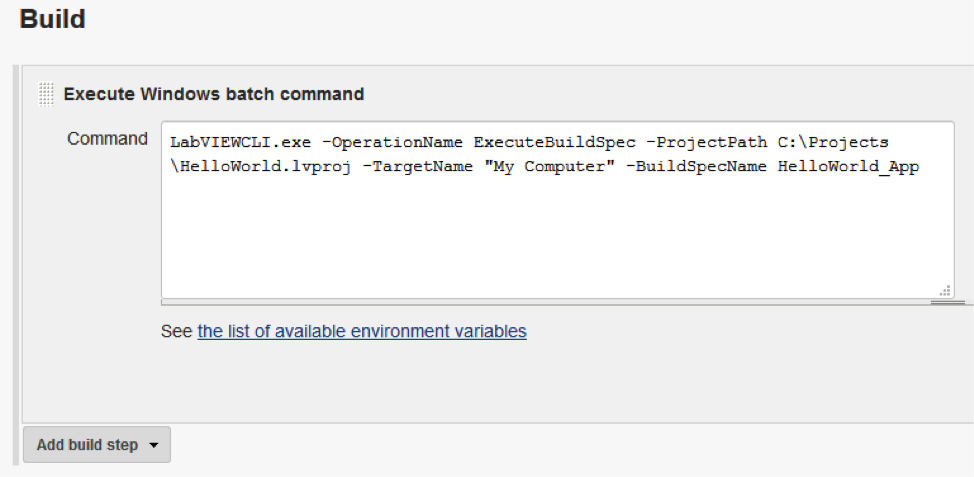
You will need to make sure you have the correct path to your LabVIEWCLI.exe – in this case I have the path installed in my Windows PATH environment variable. You can also specify the full path to the EXE as well.
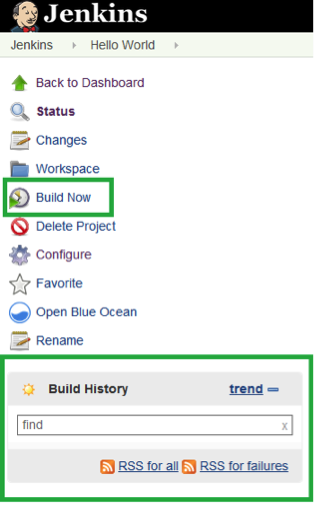
Once you’ve filled that out, hit save, and you are ready to start a build! You can click on “Build Now” at the project page to initiate a build. From the project page you can see build history and view a console log of the build process for additional debug or feedback from the build process itself. A successful build will show up as a blue circle, and a failed build as a red circle.
This is just an intro post on what you can do with Jenkins so be sure to check back often for the next blog post in the Jenkins CI series!